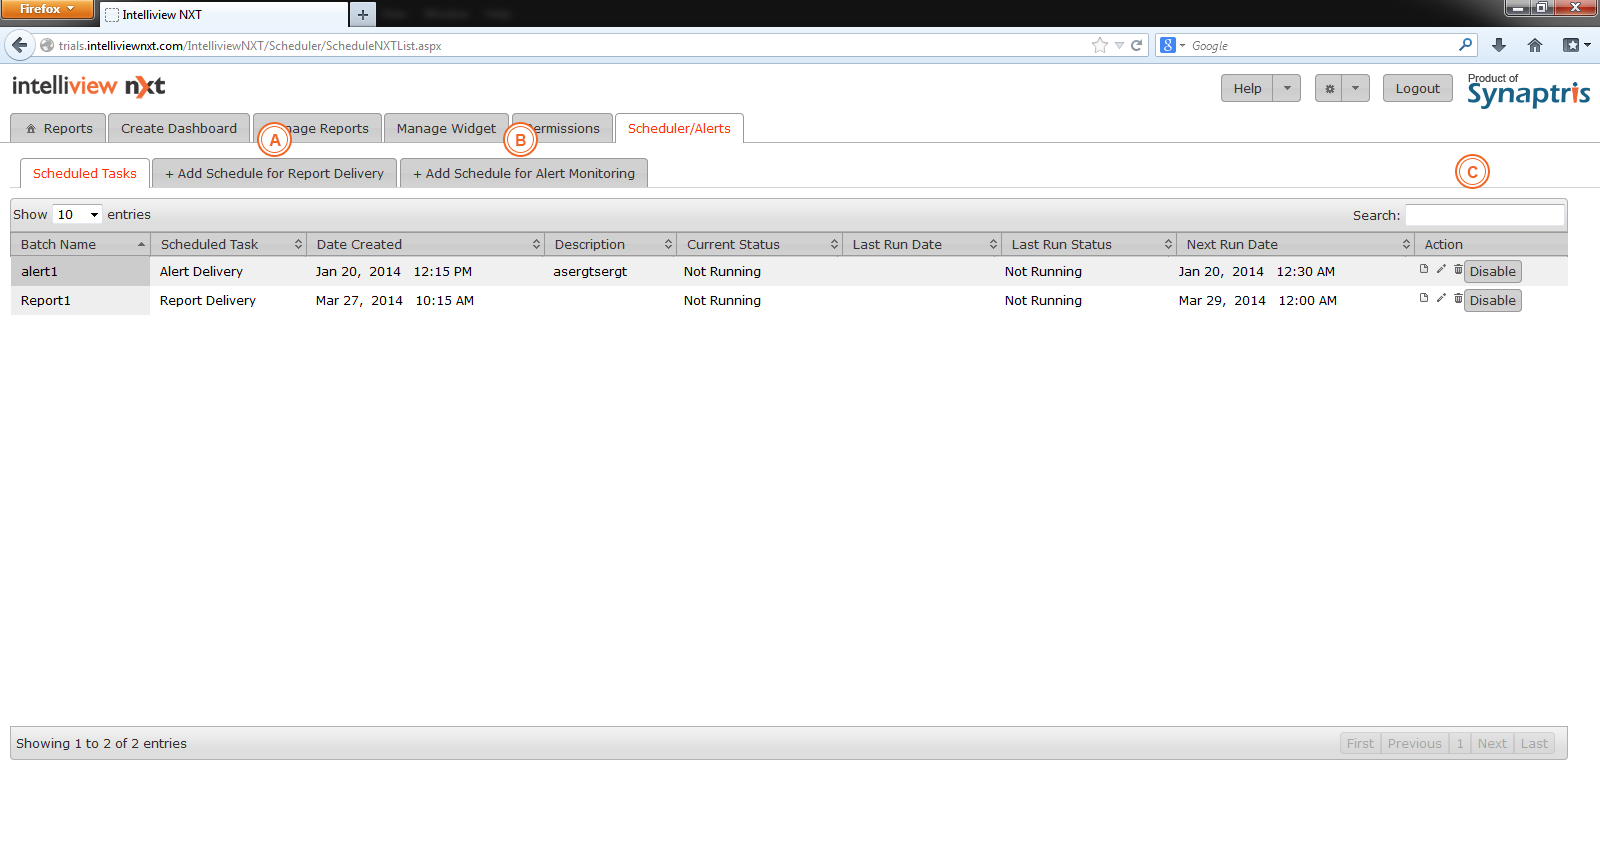
The Scheduler/Alerts section is only available to those with report authoring privileges. If you are not designated as ‘Author’ the ‘Scheduler/Alerts’ tab will not be available to you.
The Scheduler/Alerts feature of Intelliview NXT empowers you to schedule reports or alerts to be delivered to selected recipients at selected times.
Using this feature, you can schedule reports or sub-reports to be delivered periodically (i.e. at regular time intervals) to selected recipients as an E-mail with the report attached in PDF format. For example, you could set up a schedule to generate and deliver weekly sales performance reports to all team members every Friday afternoon at 3 pm, thereby facilitating planning sessions for the following week. This feature offers many customizable options.
‘Alerts’ are triggered when specified ‘Exception’ conditions for a widget are met.
‘Exceptions’ are conditional rules set up during the widget design or edit process. Report authors and editors may set up exceptions. For example, in a widget on region wise revenue, revenue levels below $1 million dollars may be defined as an exception condition. In this case, the report generated with this particular widget will highlight all the points in the widget where revenue levels are below $1 million. While viewing the report the exception points can be seen.
There might also be instances when you wish to receive a report when a particular exception condition is triggered. To achieve this, ‘alert monitoring’ can be activated. With this feature, the report is executed in the background at scheduled times and an alert is delivered to selected recipients whenever the exception condition for the selected widget is satisfied. Considering the example exception in the previous paragraph again, you could for instance schedule daily alert monitoring in order to receive alerts on days when the revenue realization was below expected levels. If the exception condition is triggered at the time of performing the scheduled check, an alert is generated for delivery to the selected recipients together with a pdf attachment of the exported widget.
When you select the Scheduler/Alerts tab, you will see a page similar to the one illustrated below. The opening page details all tasks scheduled so far and also presents options to add new schedules. You may also disable/change settings on previously scheduled tasks on this page.

|
A & B |
Add new schedules and alert monitoring |
|
C |
Search here for a previously scheduled task by batch name. |
The other columns in the image above are explained below:
|
Batch Name |
Name of the schedule. Each schedule can have one or more reports. |
|
Scheduled Task |
Whether the task is Report Delivery or Alert Delivery. |
|
Date Created |
Date the schedule was first created. |
|
Description |
Description of the schedule. |
|
Current Status |
Status of the alert or schedule – whether currently running or not. |
|
Last Run Date |
The last date on which the schedule was executed. |
|
Last Run Status |
Status of the last time the schedule was executed. |
|
Next Run Date |
Next date on which the schedule will run again. |
|
Action |
You can edit, delete or disable a schedule by clicking on the appropriate icon here. |