
The options available in the Dashboard Viewing Menu tab, located towards the top of the dashboard, are explained below.
|
A |
Link Widget Clicking on this button links the widgets, any modifications made to a widget such as drill down propagates to the other widgets in the current dashboard tab (sub report) that you are currently viewing. The default setting for “Link Widget” is off which enables operations on each individual widget without the changes impacting/propagating to the other widgets in the sub report |
|
B |
Resize Widget When you click on this tab, you will see grid lines between widgets. You can drag these lines using the mouse and change size of each widget on the dashboard. |
|
C |
Clear All Clicking this button will clear all the filters applied or any other changes made to the dashboard and reloads the dashboard, as it was originally designed/saved. |
|
D |
Show Filters Clicking on this button will provide a detailed summary of all the Smart Filters, Quick Filters, Data model Filters and Linked widget filters applied to the dashboard. |
|
E |
Edit As shown in the image above, clicking on this button provides the option to edit the 'dashboard' and the 'data model filters' on the dashboard. The Edit option will be available to you only if you are the Author of the Dashboard or if the Author has assigned you Editor privileges to the dashboard. If you have Viewer privilege to the dashboard, the Edit button will not be visible when you view the dashboard. |
|
F |
Save Clicking on the button allows to the option to Save as Sub Report: This option will be available when you drop down the Save button if you are the Author of the Dashboard or if the Author has assigned you Editor Privileges to the dashboard. If you only have Viewer privilege to the dashboard, the “Save as Sub Report” option will not be visible when you view the dashboard. If you are the Author of the dashboard or have editor privileges to the dashboard, you can make changes to the widgets and the dashboard and save your changes as a Sub Report leaving the original dashboard tab (sub report) unchanged. Please refer to the Editing Dashboards section for more details. |
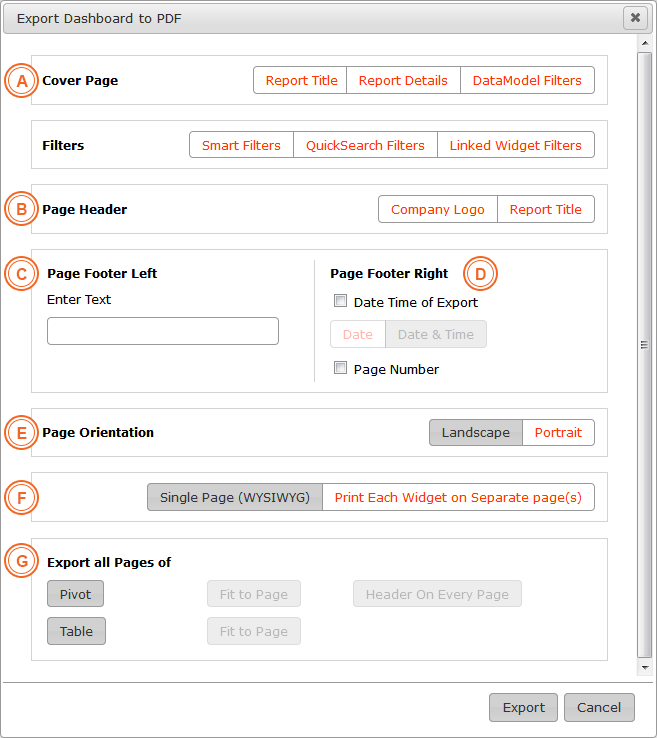
You may also export the dashboard as a pdf file by choosing on the 'Export Dashboard' option under “Save”. If you choose to do so, you will see the screen below:
|
A |
Here you can choose what information should be on the cover page of the dashboard. Choose from Title, Description and Data Model Filters, which can be unique for each sub report. The Filters section below enables you to include details of any Quick Search. Smart Filters or Linked widget filters that may have been applied at the time of exporting the dashboard. |
|
B |
The 'Page Header' appears on each page of the dashboard and you may choose to have your company logo and title printed on each page of the dashboard. |
|
C & D |
The Page Footers appear on each page and you have options to customize footers on left and right side footers in this section. |
|
E |
Here you can choose whether the dashboard is to have Landscape or Portrait orientation the default is Landscape. |
|
F |
You can opt to have the entire dashboard printed on one page (the way you see it on the Intelliview NXT screen) or you can have each widget printed on a separate page, - the default is WYSIWYG |
|
G |
Since Pivot and Table widgets are typically large and can span multiple pages; here you can choose to export the Pivot or Table as multiple pages or just the part of the Table/Pivot that is visible on the screen. You may also opt to add Report header on every page of Pivot table if you wish. |
![]()